I am a big advocate of the Karty textbook and how it presents mechanisms to the audience. However, mechanisms are not every student’s favorite topic. While some chapters are quite easy to present, others prove to be more challenging for students. I have found that Chapter 7 (“An Overview of the Most Common Elementary Steps”), for example, is one of the harder chapters to teach. With this in mind, I use each year to bolster my skills and presentation of the material. For those instructors who are still in their early years of academia, I write this post with you (and myself) in mind as we try to evolve in the classroom. For those who are veterans, I hope to find your responses in the “Comments” section at the end!
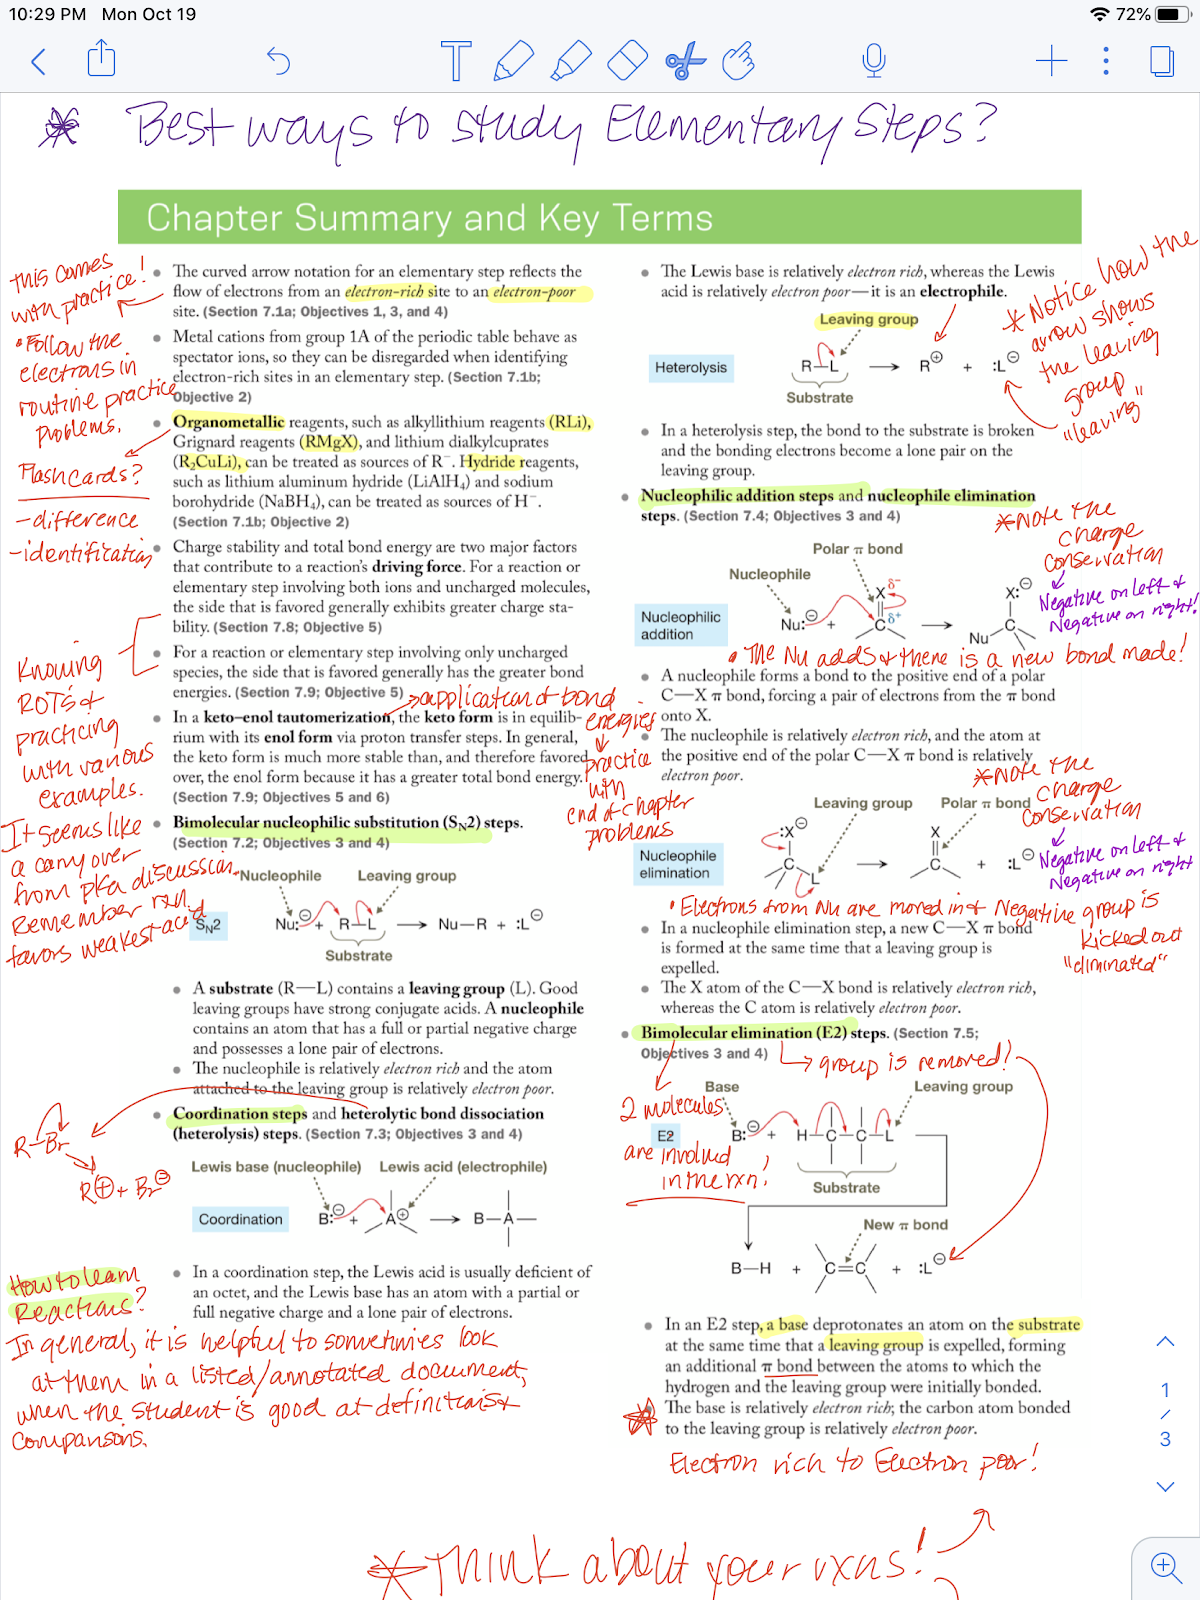
In this year’s class, a student asked me, in a Perusall annotation, about the best way to learn this material. To answer this question, I have included screenshots of the “Chapter Summary and Key Terms” from Chapter 7 below, which also contain my own suggestions to help my students tackle the challenging realm of organic reactions and mechanisms.
With these notes in mind, I will share some of my best tactics for learning the elementary steps of organic chemistry:
- Always look at each reactionary step as the nucleophile vs the electrophile.
Many times in the classroom, I use mnemonic devices to help my students recall the two species of nucleophiles and electrophiles. For instance, nucleophiles have a negative charge and need to give away their electrons, while electrophiles are positive and eat the electrons from the interacting reagents. Some examples of nucleophiles include Lewis bases, and some examples of electrophiles include Lewis acids.
Another way of looking at these two species—nucleophiles and electrophiles—is to remember that Lewis bases donate electrons because the “b” is a backwards “d.” On the other hand, Lewis acids, which are also electrophiles, are attacked. Keep in mind that the “e” and “a” in Lewis acids are meant to signify electrons and acceptors, respectively.
When I struggle to develop mnemonic devices or real-world examples for certain topics, I try to be honest with my students. Sadly, there are some concepts that don’t have any real shortcuts, so students have to forgo the help of mnemonics or other tricks when learning the concepts and making solid connections. Because some chemistry concepts don’t have any relevant analogies, they need to be learned through memorization. Even though I hate saying this to my students, it’s important for them to know. This is why I insist that my students constantly practice by putting their pens to paper, as discussed in an earlier post. For example, topics like organometallics and hydride reagents need to be learned through practice (solving problems by hand) or other learning resources, such as flashcards. I particularly like flashcards because they help students with associative learning and with differentiating between the uses and types of bases.
- Break down the names of the reactions and explain the “tells” of the various steps.
To start, I compare heterolysis vs coordination. First, I break down the names. Hetero- means different or other, while -lysis means to break. Together, I translate heterolysis as a process in which a bond is broken and a pair of electrons is given to one atom, resulting in the other atom earning a positive charge.
The next question that arises from my students is, “How do you know which atom to give the pair of electrons to?” To lead them to the answer, I mention electronegativity (EN) and ask them, “Which atom is better able to handle the negative charge if, for example, we’re looking at bromine and carbon?” Bromine has a EN value of 2.96, while carbon has a EN value of 2.55. Because the more electronegative atom handles the negative charge better, then the bromine atom receives the pair of electrons.
Coordination, on the other hand, is the combination of two things, i.e. a nucleophile and an electrophile. The arrow between the species is drawn from negative to positive. Because coordinate means “to bring different elements together,” this action is observed through the movement of electrons from the nucleophile to the electrophile, i.e. from negative to positive! I like to tell my students that they can think of a coordination reaction as one in which “opposites attract,” or when two people become one couple.
Moreover, chemistry is all about stability, so I try to impress upon my students that the overall charge is conserved. If the combination of the two species—the nucleophile and the electrophile—is an overall neutral charge, then the right side collectively stays neutral, which is made evident when there are no charges, or a zero charge, in the product.
After reviewing heterolysis and coordination, my lecture then transitions to categorizing these reactions as nucleophilic vs electrophilic by focusing on their elementary steps. First, I remind my students, again, that nucleophiles have a negative charge while electrophiles have a positive charge. Then I try to help them identify addition, substitution, and elimination reactions.
In both cases, nucleophilic and electrophilic reactions have similarities among the three reactions mentioned above: addition, substitution, and elimination. When looking at nucleophilic reactions, in particular, I like to reiterate these three points to my students:
- In an addition reaction, the nucleophile comes in and adds onto an electrophilic atom.
- In a substitution reaction, the nucleophile comes in and substitutes, which means that it takes the place of another group—the leaving group. In other words, no new bonds are made. I like to use the metaphor of a car (the nucleophile) taking the place of a previously parked car that is now leaving its current spot (the leaving group) to describe substitution reactions through a real-world example.
- I also tell my students to keep an eye on the key words that tend to be associated with substitution reactions. One example of such a word is bimolecular. Similar to what I do with the term heterolysis, I break down the word: bi- means two things, while molecular means molecules. In the case of a bimolecular nucleophilic substitution reaction, then, we have a nucleophile and a substrate. To provide my students with another real-life connection, I tell them to envision a scene of parallel parking in which one car leaves (the leaving group) and another car comes in (the nucleophile).
- In an elimination reaction, the nucleophile comes in and the leaving group leaves. However, this reaction creates a double bond that “eliminates” (hence the name!) a negatively charged species.
In all cases, I try to impress upon my students that the charge is conserved in all nucleophilic reactions. If the reaction starts negative, then the right side collectively stays negative.
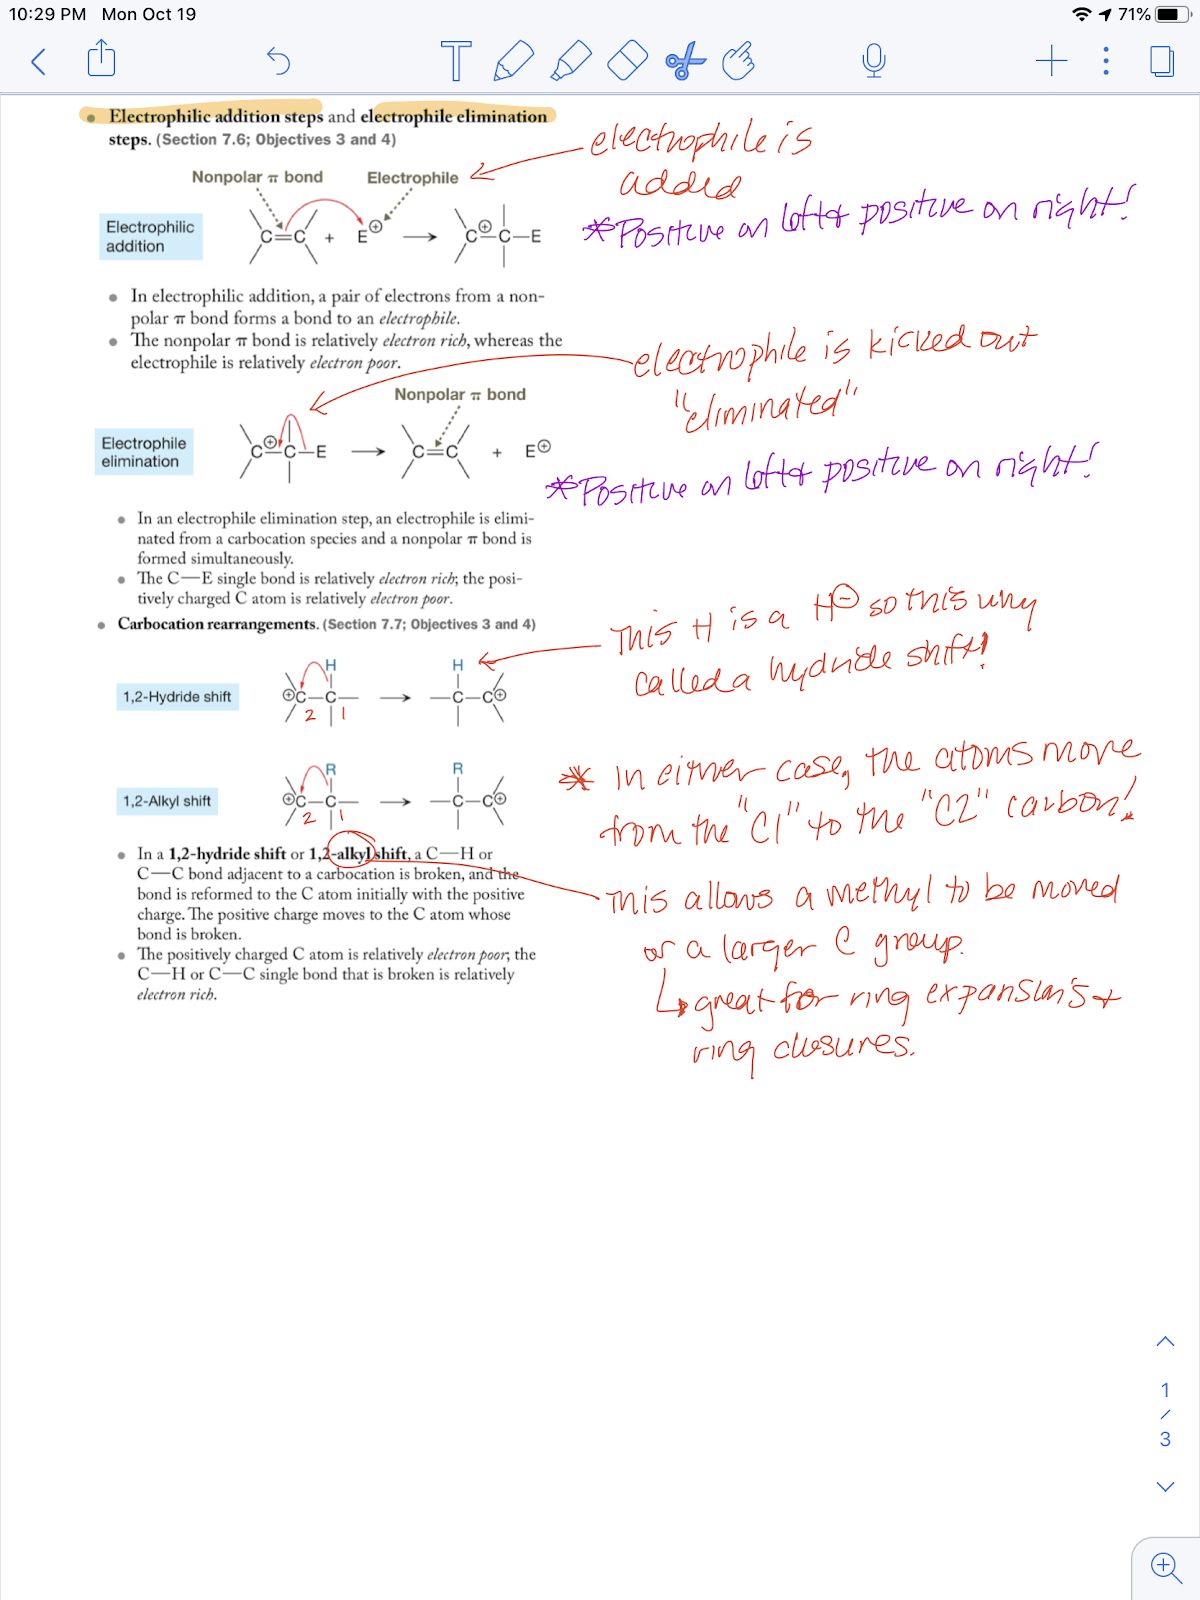
On the flip side, when looking at electrophilic reactions, I like to emphasize the following three takeaways to my students:
- In an addition reaction, the electrophile comes in and adds onto a non-polar pi bond.
- In a substitution reaction, the electrophile comes in and substitutes—it takes the place of another group—the leaving group. No new bonds are made.
- In an elimination reaction, the electrophile is “eliminated” and a positively charged species is produced. This reaction still creates a double bond.
Just as I noted for nucleophilic reactions above, I emphasize to my students that the charge is conserved in all electrophilic reactions. If the reaction starts positive, then the right side collectively stays positive.
My overall goal with Chapter 7 is to “translate” the material into a language that my students are more comfortable with and can better understand. I equate the language of organic chemistry with the use and application of a foreign language in a study-abroad experience. For instance, when students prepare for a trip overseas, they must first learn the language. Later, once they have arrived in the new location, they can then begin to apply what they have learned to their daily encounters. Thus, I view the first semester of organic chemistry as learning the language behind the science and the second semester as the application of this new and exciting language.
I wholeheartedly believe that our job, as instructors, is to make organic chemistry as clear and as manageable as we can for our students. Our goal is not, by any means, to add to their confusion by making this course harder. Inhibiting growth in the classroom can discourage students from exploring potential careers and experiences in the future that they could have been great matches for and would have greatly benefited from. Rather, I like to remind myself that we—students and professors—are on the same team, so our students’ success also means our own success as their educators.
-Kerri Taylor, Columbus State University
Feel free to share what you’re doing with your online classes this fall in the “Comments” section below!
Good stuff, thanks again.
It’s good to think about learning another language when bringing students through Chapter 7. I might go so far as to say that the reactants in an elementary step can be thought of as nouns, curved arrows can be thought of as verbs, elementary steps can be thought of as sentences, and multistep mechanisms can be thought of as paragraphs…?
I also like how you associate the name of each elementary step with what is taking place in the elementary step. That goes a LONG way toward combatting memorization.